I built a version 1 input board and it didn't work.
As it turns out, it didn't work for several reasons. One of those reasons can be found upon inspection of the back of the board; one of the traces on the output connector goes right across another pad, connecting them. Another problem was that I probably connected the board wrong. The main issue was related to communication, and specifically the polarity of the latch or chip select signal. I'll post soon with some details about how communication actually works with the chips I'm using. The important thing at the moment is that the problem seems to be mostly solved. I'm not entirely sure, though, because I think I fried a shift register.
2016/04/11
2016/03/30
Input PCBs
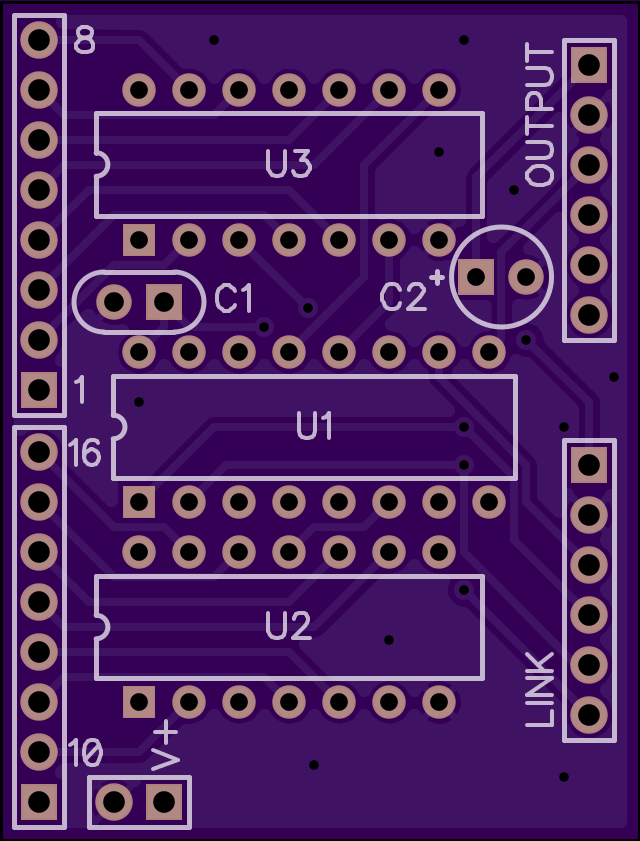
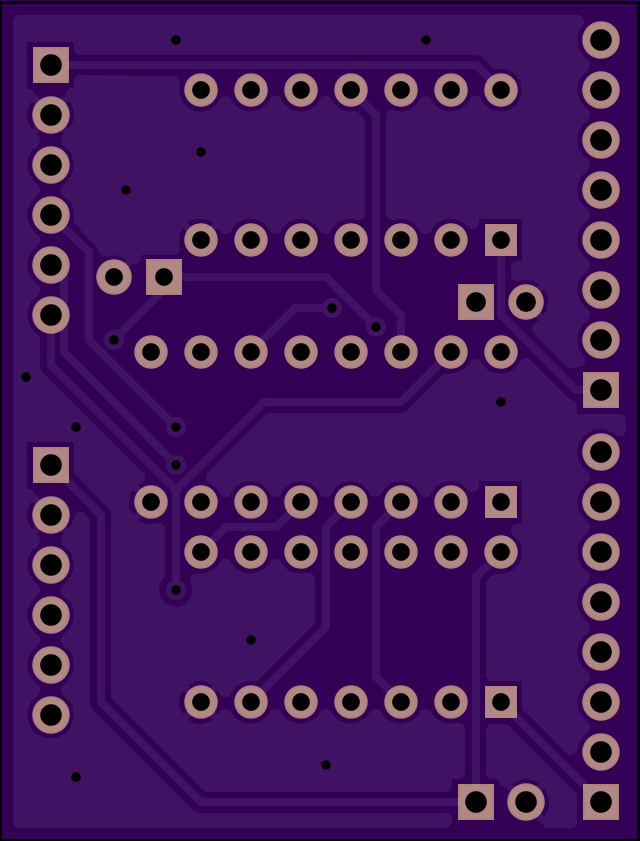
I put together a preliminary layout for the input PCBs and ordered them today. I'm using SN74HC32 4-channel OR-gates and SN74HC165 parallel-in serial-out shift registers to read sets of 8 notes from the keyboard. Here's the layout, as rendered by OSHPark:
 |
| board top |
 |
| board bottom |
2016/03/09
Electronics are hard.
Sometimes, the easy way turns out to be a little bit harder than you thought.
As I will explain as soon as I get to the keyboard layout explanation post, there are some pairs of keys on the keyboard which play the same note. I had initially planned to connect the common pins of each pair of keys and have one connection on the circuit board, but I realized that I had missed something painfully obvious about that approach.
[more inside...]
2016/02/26
Not so fast...
The valves don't actually work. Once I hooked them up completely, they either didn't open when they should, or they never closed after opening. Some leaking in the valve body was expected, but the input side leaked too much and broke things. A new design is in progress, and I'm hoping to get to testing soon. I'll do a full write-up soon.
2016/02/09
Keyboard, Assembled!
This post details the final assembly of the keyboard and some details about how it almost didn't work out. I was going to include an explanation of the keyboard layout in a little more detail, but this post got a lot longer than I was expecting, so I'll write about that separately.
2016/02/02
Laminate flooring eats hole saws like potato chips.
I've decided to go ahead and make a keyboard for the organ. It's going to have a layout based on that of a chromatic button accordion, and will have a total of 107 buttons. I decided that instead of trying to construct a workable representation of a piano keyboard, it would be easier to use regular arcade-style buttons and find a layout that would be more suitable for the larger spacing between buttons. The system is pretty straightforward; moving along each right-slanting diagonal moves up the scale by half-steps, and moving to the right or left by one button moves up or down three half-steps respectively. Because the relationship between each note and the notes around it is always the same, any given chord will have the same shape in any key (alternate fingerings notwithstanding). This is known as isomorphism.
After laying out the keyboard on paper to get an idea of the size and how it would feel to play, I bought a Milwaukee-brand hole saw and a 2x4-foot, 1/4" thick sheet of MDF for the keyboard panel, assuming that it would be a matter of an hour or two to lay out and cut the panel. I was wrong.
The first problem I encountered was that the MDF punched through like wet cardboard once I got past about half-depth cut, tearing chunks out of the back of the panel even with relatively light pressure. I quickly abandoned the MDF when I realized I had a few pieces of laminate flooring lying around, and I set about laying up the pattern again after a test cut on a scrap area.
To ensure that I had clean surfaces on both front and back of the panel, I cut about halfway through from the back side and finished each hole from the front. I had cut about two-thirds of the back side and about a quarter of the front when I realized that it was taking significantly longer to cut the holes than it had taken when I started, and I realized that I had completely worn out the teeth on the hole saw, which I had purchased only a few days previously.
I would have expected it to have no trouble with the laminate flooring, which is essentially an engineered fiber similar to MDF but more compressed. After all, if it's labeled for cutting steel, the wood fibers should be no problem. I was actually quite surprised by the degree of wear that was created, and I concluded that - as I had just purchased it - it was probably reasonable to take it back to the Homeless Despot for a refund. I decided to replace it with a different type, hoping that it would last longer.
It did the job, but by the time I had finished, I was rocking the bit by as much as 10 degrees to get it to cut into the material, and I wound up with this.


By this point I had spent two afternoons and evenings working on the silly thing, and my hands were killing me from working the drill, but I was finished cutting holes. Then it was time to wait for the buttons to arrive.
After laying out the keyboard on paper to get an idea of the size and how it would feel to play, I bought a Milwaukee-brand hole saw and a 2x4-foot, 1/4" thick sheet of MDF for the keyboard panel, assuming that it would be a matter of an hour or two to lay out and cut the panel. I was wrong.
The first problem I encountered was that the MDF punched through like wet cardboard once I got past about half-depth cut, tearing chunks out of the back of the panel even with relatively light pressure. I quickly abandoned the MDF when I realized I had a few pieces of laminate flooring lying around, and I set about laying up the pattern again after a test cut on a scrap area.
To ensure that I had clean surfaces on both front and back of the panel, I cut about halfway through from the back side and finished each hole from the front. I had cut about two-thirds of the back side and about a quarter of the front when I realized that it was taking significantly longer to cut the holes than it had taken when I started, and I realized that I had completely worn out the teeth on the hole saw, which I had purchased only a few days previously.
I would have expected it to have no trouble with the laminate flooring, which is essentially an engineered fiber similar to MDF but more compressed. After all, if it's labeled for cutting steel, the wood fibers should be no problem. I was actually quite surprised by the degree of wear that was created, and I concluded that - as I had just purchased it - it was probably reasonable to take it back to the Homeless Despot for a refund. I decided to replace it with a different type, hoping that it would last longer.
It did the job, but by the time I had finished, I was rocking the bit by as much as 10 degrees to get it to cut into the material, and I wound up with this.


2016/01/30
Success! pt II
Well, the initial testing of the valves was a complete success. I tested a 1" size horn with a 3/8" main line and got snappy response and good attack and release. This means that (at least) the low-mid to middle range of horns is tentatively confirmed to work nearly end-to-end. I've got the programming part working (in a basic form), the control boards work, the gate valves are good to go, and I've only to confirm that the gate valves work reliably with the solenoids. The valves were assembled by aligning the layers and applying cyanoacrylate adhesive (superglue) to the edges where the layers meet. I had to do a couple of test runs to get the settings right, but I wound up with clean edges and a generally good cut. Seems like I should be alright with these valves. I still have to check how they work with the smaller main port size as well, but after that, I'm pretty much ready to go full-scale.


2016/01/28
Valves, lasers and regulation (with pictures!)
TL;DR because this is the longest post to date:
I have solenoid valves, but they're not big enough. I designed around that, and learned how to use a laser cutting/engraving machine. Amazon sent me a regulator even though it was out of stock, and their CSRs offer conflicting information.
Subscribe to:
Posts (Atom)